
Code
The editor with a language server, git and a terminal; the same editor that opens a game's or an app's Source.
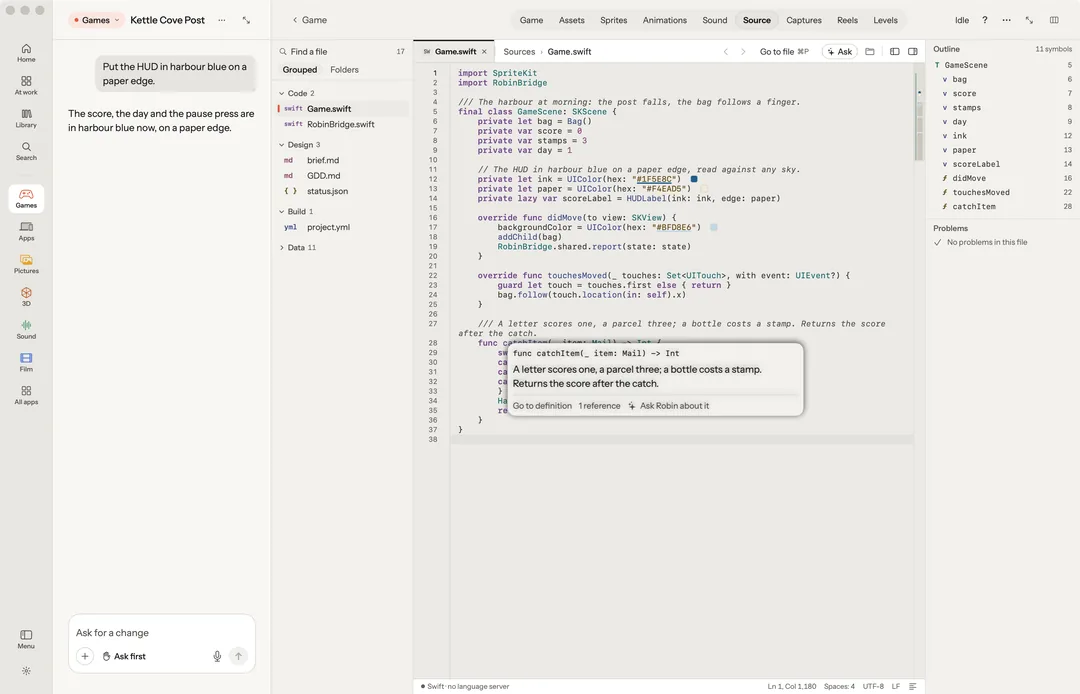
Code is the editor, git and a terminal. It shows once you turn on Settings › Developer tools ("A terminal under the work and editing in the code view. Off unless you turn it on.").
The rail
- Files: the project's files, in the editor, with git.
- Code: the coding bench.
- Screen: drives any Mac app by its controls. It needs Accessibility permission, and Screen Recording for captures.
- Terminal: the project's terminal.
New Claude Code starts a chat that runs in the Claude Code you installed, with your own plan or key. It needs a project open. The other coding agents on your Mac are offered the same way: New OpenCode, New Codex, New Cursor.
OpenCode runs as the OpenCode you installed (from opencode.ai), with the model providers you signed it in to (opencode auth login in a terminal) and your own OpenCode setup; Robin reads none of your keys. Its words and each step it takes, a file read, a command run, show in the chat as they come; what it would ask in a terminal, it asks in the chat, as the mode chip says; Stop ends its turn and keeps what it had said. When OpenCode is not on your Mac, or has no sign-in for the provider its model needs, the chat says so in plain words with what to do, and its card’s Sign in opens opencode auth login in Robin’s terminal, where you choose the provider and give it your key yourself; then Continue.
The editor
Tabs, an Outline, find and replace, Rename and references, Save and Save all. A game's or an app's Source opens in this same editor, with its colours. A note reads as a page, a check record as its checks, other data as an outline that folds, and every hex colour written in the code (#rgb, #rrggbb, 0x…) shows as that colour. Without Developer tools, Source is read-only.
Source, as an IDE
The code sits under one slim bar, with the files on one side and a column on the other: the file’s outline, which follows the caret, what Robin last wrote in it, and its problems, each a press to its line.
- The file map down the editor’s right edge shows what the file is made of: a band for each type and function, its colours as dots, a tick for each problem and Robin’s marks. Press or drag to go there.
- What Robin wrote is marked in the gutter. Rest on a mark for a card saying what was asked and when, with Compare with before and Undo it.
- Go anywhere: ⌘P a file, ⇧⌘O a name in this file, ⌘T a name in the project, ⌘L a line, ⇧⌘F words across the project. ⌃⌘← and ⌃⌘→ go back and forward through where you have been.
- The files show Grouped or as Folders. Open in Xcode (or Android Studio, or VS Code) opens the project in its own app.
Language servers
Errors, completions and go to definition come from a language server, when one is on your Mac. The status bar names the one in use and how it is doing: ready, starting, or started again after a crash.
- Hover a name for its signature and documentation, and how many references it has.
- Completion as you type, or ⌃Space, with its documentation; ⇥ steps through the places a completion leaves to fill. Signature help shows as you type
(and,. - Go to definition (⌘-click or F12), References (⇧F12), and every other use of the name washed as the caret rests on it.
- Rename (F2) changes every file at once, as one step that ⌘Z undoes in all of them.
- Quick fixes: the gutter’s lightbulb, or ⌥↩, offers what the server can mend.
- Format the file (⇧⌥F) or the selection (⌃⇧I). Format on save is in Settings › Developer tools, off to start.
- Problems show as squiggles, a dot in the gutter and the worst one said at the end of its line, and in Source’s problems list.
- Folding from the gutter, or ⌥⌘← and ⌥⌘→. Inlay hints are in Settings › Developer tools, off to start.
Robin finds the servers here:
| Language | Server | How to get it |
|---|---|---|
| TypeScript, JavaScript | The project's own TypeScript, run by Node, else typescript-language-server | Building the game or npm install puts TypeScript in the project; Node with brew install node |
| Swift | Xcode's sourcekit-lsp | xcode-select --install |
| C, C++, Objective-C | Xcode's clangd | xcode-select --install |
| C# | csharp-ls or OmniSharp | brew install dotnet, then dotnet tool install -g csharp-ls |
| Python | pyright-langserver, basedpyright-langserver or pylsp | brew install pyright |
| Go | gopls | go install golang.org/x/tools/gopls@latest |
| Rust | rust-analyzer | rustup component add rust-analyzer |
| Kotlin | kotlin-lsp or kotlin-language-server | brew install kotlin-language-server |
| JSON, CSS, HTML | vscode-json-language-server and its kin | npm i -g vscode-langservers-extracted |
| YAML | yaml-language-server | npm i -g yaml-language-server |
| Markdown | marksman | brew install marksman |
With no server, a file is still edited and coloured, and the status bar says which server is missing. How to install asks first, then runs the command in Robin’s terminal in the project’s folder, where you watch it; the file connects by itself once the server is there. Robin never installs one silently. GDScript’s server lives inside a running Godot and is not asked.
On any line: Go to definition, References, Ask Robin about it, Ask Robin to fix it, Show the change and Undo what Robin wrote here. If the file changed on disk too, choose Keep mine or Take theirs.
Robin can do this too. From the chat, Robin asks the same language servers where something is declared and used, what it is, and what errors a project has, through its code kit. It renames and formats too, in the file’s tab when it is open, so ⌘Z takes it back. When a server is missing it gives the same install line; only you can press How to install.
Keys
| Key | What it does |
|---|---|
| ⌘S / ⌥⌘S | Save / save every file |
| ⌘W | Close the tab |
| ⌘P | Go to a file |
| ⇧⌘O | Go to a name in this file |
| ⌘T | Go to a name in the project |
| ⌘L | Go to a line (in Source) |
| ⇧⌘F | Find words across the project |
| ⌃⌘← ⌃⌘→ | Back, forward through where you have been |
| ⌘/ | Comment |
| ⌘D | Duplicate the lines |
| ⌥↑ ⌥↓ | Move the lines |
| ⇧⌘K | Delete the lines |
| ⌘] ⌘[ | Indent, outdent |
| ⌥⌘E | Select the next one the same |
| ⇧⌥F / ⌃⇧I | Format the file / the selection |
| ⌥↩ | Quick fixes at the caret |
| ⌥⌘F | Find and replace |
| ⌘G ⇧⌘G | Next, previous match |
| ⌃Space | Completion |
| F12, or ⌘-click | Go to definition |
| ⇧F12 | References |
| F2 | Rename, across files |
| ⌥⌘← ⌥⌘→ | Fold, unfold |